Using Chrome Extension To Track User Events (Part 1)
Building a chrome extension to track user events on Stack Overflow
 Image credit: Google Images
In this age of adaptation and personalization, user insight plays a key role. What is the user demographic? What is the user interested in? What type of content does user mostly consume? What's the surfing pattern of the user? These are all sorts of questions that can reveal a lot about the audience. So how do we get answers to these questions?
It all starts with user tracking.
Events like user comments, likes, up-votes, down-votes, scrolling pattern, time spent on the website can be tracked. This blog post discusses an approach to perform user tracking.
Problem Statement:
(a) Create a website that permits account creation and log-in.
(b) After the user is logged in, direct the user to a user profile page, which links to the page https://stackoverflow.com/questions/tagged/java?sort=frequent&pageSize=15
(c) Log the interactions upon the usage on the pages. (i.e. click, post, answer, comment, bookmark, thumb up/down, scroll to read, mouse movement trajectory, etc...)
First thoughts
There are various analytics libraries available such as Google Analytics Library, Hammer.js, that can be simply plugged in and used.
However, there's a catch. Since navigating to Stackoverflow.com would take us out of our application's domain, I doubt if it's possible to track the user once he has navigated outside the domain of our web application.
Possible Approaches
1. Mirror site locally.
One solution could be to mirror the stackoverflow.com website locally. Once the user clicks the link, the page can be downloaded and then rendered from the local server. That would also give us the freedom to track all the user's events.
Catch: Trying to mirror the whole website for the sake of tracking, is a bit of an overkill.
2. Using a Browser Extension.
Another solution could be installing a Chrome extension. The most apparent benefit is that it can let us track the user on the browser level, freeing us from any constraints of our web application's domain.
Catch:
This approach involves having the user to install the extension for us to track his events, which is a bit interfering, to say the least.
Browser Extension Approach
Technology Stack
Extension type: Google chrome extension
Server: NodeJS
Client: EJS View Engine, HTML, Javascript, JQuery
Database: MYSQL database.
Architecture
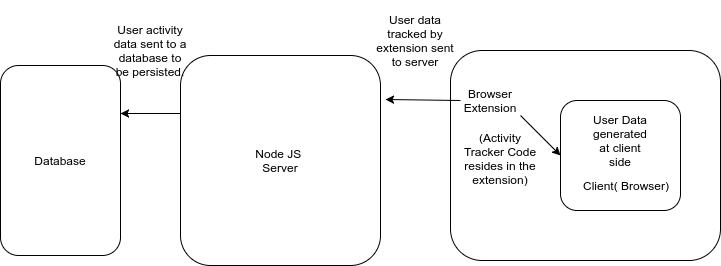
Strategy
Our strategy is to intercept user events using a browser extension, retrieve the information from the event and send the data to our server, which in turn send the data to the database server for storage.
Components
Chrome extension
For building a chrome extension, we need 3 files:
- manifest.json
- inject.js
- background.js
1 .manifest.json
{
    "name": "AWAssignment",
    "version": "0.0.1",
    "manifest_version": 2,
    "description": "Tracking user events",
    "homepage_url": "https://bitsandmusic.com/",
    "background": {
        "scripts": [
        "jquery-3.2.1.min.js",
        "background.js"
        ],
    "persistent": true
    },
    "browser_action": {
        "default_title": "Inject!"
    },
    "permissions": [
          "https://*/*",
          "http://*/*",
          "tabs",
          "http://localhost:*/",
          "http://192.168.0.15:*/"
        ],
    "content_scripts": [ {
          "js": [ "jquery-3.2.1.min.js" ],
          "matches": [ "http://*/*", "https://*/*"]
        }],
     "content_security_policy": "script-src 'self' https://cdn.socket.io; object-src 'self'"
    }
The key “background” is worth noticing here as it refers the second file required for building our extension: background.js.
“background”: { “scripts”: [
                    “jquery-3.2.1.min.js”,
                    “background.js”
                 ],
2 . background.js
// this is the background code…

chrome.tabs.onUpdated.addListener(function (tabId, changeInfo, tab) {
 // for the current tab, inject the “inject.js” file & execute it
 if (changeInfo.status == ‘complete’ && tab.active) {
 chrome.tabs.executeScript(tab.ib, {
 file: ‘inject.js’
 });
 }
});
This code controls when our extension should start working. For our project, we need to start tracking once the tab has loaded completely. This file refers to the final and core piece of our extension: Inject.js.
3 . inject.js
(function() {
//user tracking code goes here
})();
Events to be tracked
Following user events can be tracked to get user insight.
- Click information.
- Mouse pointer coordinates information.
- Ctrl-c information.
- Ctrl-s information.
- Scroll information.
- Up-vote/Down-vote information.
To deploy the extension:
Navigate to Chrome->More Tools->Extensions.
Click on the load unpacked extension button and select the folder where your extension code resides.
2 . NodeJS server
We set up a NodeJS server to collect information from the browser extension and persisting the data.
3 . Database (MYSQL)
We use MYSQL database server for storing the user event data. Although I do see it getting changed to a NOSQL database such as MongoDB, owing to the type of data we are dealing here.
NodeJS-Chrome Extension communication
Here’s a pain point. Majority of the internet has migrated towards HTTPS from HTTP. However, our NodeJS server uses HTTP protocol, since we don’t have a SSL certificate. Any attempt at communication between our NodeJS server and our browser extension would result in a Mixed Content Error.
So how do we solve this issue ?
We create a self signed SSL certificate to calm down our browsers who are still red from freaking and shrieking about that “HTTP” in the address bar.
Important thing to remember
openssl req -new -sha256 -key key.pem -out csr.csr
This command generates a Certificate Signing Request, which you could instead use to generate a CA-signed certificate. This step will ask you questions; for the key “Common Name (e.g. server FQDN or YOUR name)”, enter the value localhost.
Once you have created the SSL certificate, you will have two files:
- key.pem
- certificate.pem
You will need these files to set up HTTPS nodeJS Server.
Now that you have set up the server and the extension, time to test the solution.
Enter https://localhost:443 in the browser address bar.
You will see a screen like this.
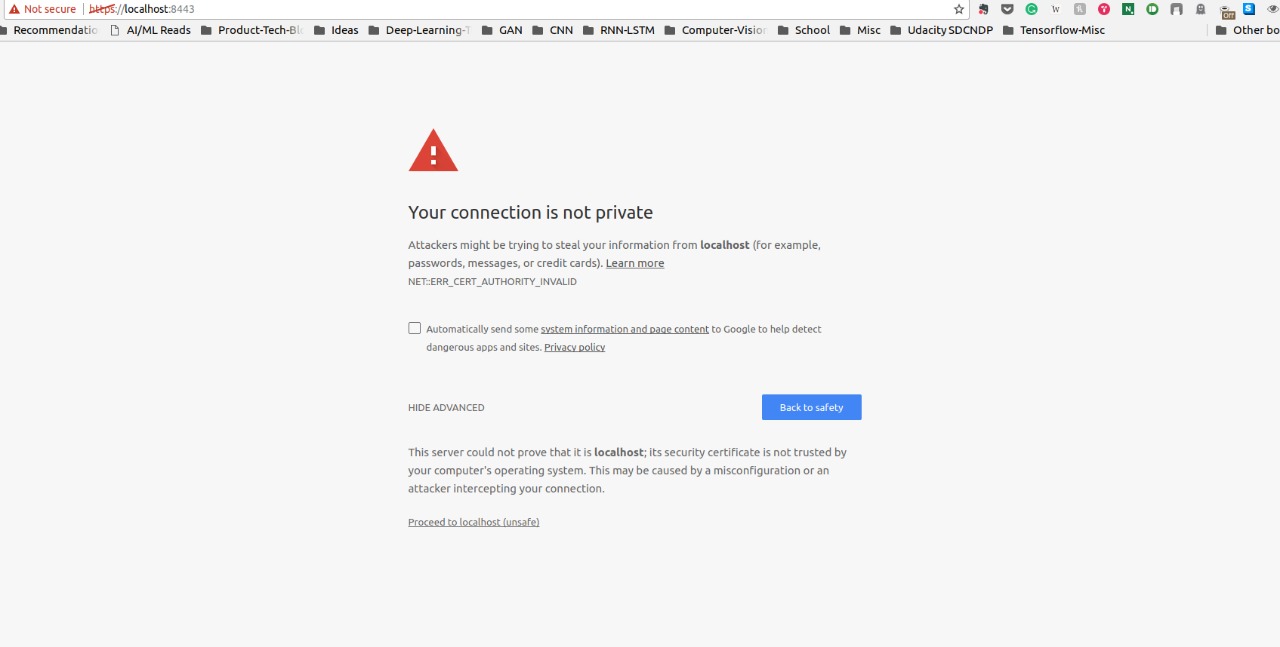
Click Advanced->Proceed. And you are good to go.
Piyush Papreja
Software Developer
My research interests include music information retrieval, recommendation systems and web.